Saturday, 27 August 2011

McCall's 5432


I have had this pattern in my stash for a few years, picked up on a whim due to the bright colours used in the outfit. What was I thinking??? No way could I ever pull this off myself!!! The interest in the shoulder detail did grab my attention, as to the mandarin collar, even though I knew they were easy features to pull off. So, this was the week to give it a try. I was a bit apprehensive when only one other person on PatternReview had tried making the jacket that it was going to turn out to be a real dud...what did everyone else see that I didn’t??? Anyway, make it I did and here are my thoughts...

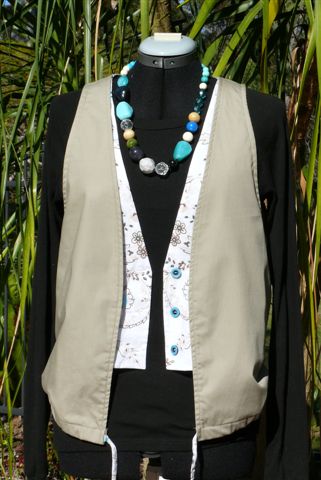
My finished version.....

My final verdict – not a bad little everyday jacket. I was after a jacket for work, one that wasn’t involved to make and would be easy to wear. We are coming into our Spring here ‘Down Under’ so a lined jacket is not needed. And being a teacher of little 8 year olds, a jacket that I wouldn’t cry over if paint or grubby hands touched was also needed. McCall’s 5432 seemed to fit the bill on this occasion. So simple and easy to construct, just a few hours work from start (cutting out paper pattern) to finish. An effortless jacket to add to the working wearable wardrobe. So here is a quick review of my thoughts...

The back didn’t have any yoke feature, seam with a vent, or pleat details. In other words a very plain back. Which reads to me as having no ‘give’ for movement. So instantly I decided to use a fabric with some stretch component to overcome this.

Fabric used is a cotton blend stretch in cream (so not like the pattern colours!!!), and a beautiful Japanese contrast fabric in ‘my colours’. You might be able to glimpse the gold print on top.

With 7 pages of instructions there was sure to be plenty of hints and tips to refresh my memory. Though, for such a basic jacket it was a bit on the over-kill side. But on the flip side, for a beginner these instructions would have been ideal.

Front band is quick and easy to apply, though the tedious aspect of hand sewing the inside was my first ‘yuk’ moment. Not a great fan of hand sewing, but bit my tongue and continued on. Really, some may want to use the ditch in the seam method, but I do think this would show on the outside in an unattractive way if your sewing wasn’t precise. So on with the hand sewing...

Sleeve insert detail is interesting, and actually breaks up the sleeve head. Without this feature the ‘boring’ factor of a basic jacket would have won out.
Cute little cuffs also add interest to the sleeve. As carolynw pointed out, the instructions have you inserting the split on the inside – not an attractive or comfortable choice. So as suggested by carolynw I turned this little feature to the outside.

Funny thing, while taking these photos outside, as I zoomed into the cuff area a bee flying past decided that this might be a stunning flower to land on!!!

Mandarin collar is another unusual aspect of the jacket – quick and easy to whip up, if you don’t mind another bout of hand stitching!!!

I changed the way to finish the seams from the instructions, from serging to French seams. It is my personal preference to have all inside seams on garments finished to a high level and even though this is just a quick everyday jacket it was also to receive attention to the seams. So, all seams have been finished with French seams to encase the fraying threads of the jacket. With the jacket having such few seams anyway, a few extra minutes spent on this really didn't amount to much.

Overall a great jacket for work. On completion I am keen to remember this jacket in future, to be made up in an evening organza fabric to be worn over a LBD. Maybe shorten the sleeves to ¾ for this. I can see it being very simple and elegant at a formal event as a pre/post cover-up in lieu of a wrap. So all that is needed now is to wear it to work on Monday and gauge the comments for the final verdict. Fingers crossed!!!

Sunday, 14 August 2011

Vogue 8559

Yet another Marcy Tilton creation. This time a real quickie! Described as a loose-fitting, unlined jacket with dropped shoulds, sleeves and fronts longer than the back. View B, my design of choice, has contrast bands.


Saturday, 6 August 2011

Simplicity 2497 Daytime Version

Here is my version of Simplicity 2497, but as a daytime version. It is much more relaxed.

Living in a humid climate there is often days when you just don't want the feel of a tight fitting dress. So I decided to redesign this dress in a much more relaxed manor. By eliminating the waistband the dress now falls gracefully and doesn't cling to every little bump on the body. Though in saying that, it does still have shape.

This isn't the most ideal photo of the dress as the wind was playing havic with the draping.
This photo shows a close up of the ruffle on the back of the neckline. I decided to line the ruffle to give it a little more body. Then there was the need to join these two fabrics together, so I used a rolled hem. The effect is quite good. Probably a lot better than just hemming the two fabrics together.
This view is another of the back, with a belt worn around the waistline. You can see that even with a belt the dress still has some room in it for ease.
View of the front ruffle. I did narrow the ruffle down slightly to avoid the clownish look that it can have. The comfort feature is that the ruffle tends to sit away from the neck area - much cooler for summer!
This last view shows how I attached the white lining to the inside of the dress. Still using the facings the lining then forms a part of the dress, hanging in one piece.
The lining is attached to the side seam via the zipper, and also attached at the back vent. Yes, a vent was included in this dress. They are just so easy to do, and gives a garment a little edge. I eliminated the side slits as sometimes these look a little tacky in those over 30 or so. Its all about the age.....
Overall a very comfortable dress that can be jazzed up with a belt and heels. What more could I want?????

Friday, 5 August 2011

'Biased' Skirt

How brilliant is this technique????? I was filling in time prowling through creative images when I came across a tutorial at "a big dill". The finished garment on this site is a very biased skirt for a lucky little girl...

http://sewing.craftgossip.com/tutorial-very-biased-skirt/2010/09/02/

This technique intrigued me, so I hunted out a simple skirt pattern, grabbed some khaki drill fabric and sorted out a matching group of left-over thin fabric that I had that would be suitable.

And the end result....

Where are the biased strips???? Well, instead of completing the entire skirt in the technique, I only used them as a feature panel down each side....
Really has a slimming effect when worn. Making the bias strips was a little on the 'time consuming' side, but the end result was well worth it. I ended up only using 4 feature fabrics. Any more and I think the effect would have been lost. So one pattern and three plains that suited the khaki skirt fabric did the job. And with each being cut on the bias they give a creative element when placing each piece. I attached the finished side strip onto a lining fabric to give it all some strength...
Here are a few more views...

Tuesday, 2 August 2011

Simplicity 2497

Year 12 Formal time!!!! After months of hunting around for a dress for Ashlee, it was my turn to whip something up to wear to this event. So hard to do, as I didn't want a fabric that would distract from Ashlee's beautiful dress, but needed something that would compliment her unusual colourings. And it also had to suit me......
After much searching at fabric shops, not that this was the hard part, I decided on Simplicity 2497. A Cynthia Rowley design, it seemed to tick all the boxes that I was after.
The completed dress....
and from the back....
From the start the dress was a dream to make, though the fabric was a challenge. Being a silk dupoini it had the positive aspect of being resistant to wrinkles which helped to enhance the finished garment in looking crisp and formal. Though the downside was that the rough silk fibres woven through tended to fray a lot in the construction. The vibrant colour of the fabric is a gold base with black silk threads woven through. Another bonus is that this fabric is totally reversible which worked out well on the neckline feature.
I basically followed the instruction sheet to a T. And this was easy as the pattern itself is fairly straigh forward. Care had to be taken in the fitting of the dress as the design is fairly fitted.
Small changes I did make to the dress are simple enough. The first was in changing the waistline gathers to pleats. To me, gathers tend to 'enhance' the tummy area, while pleats seem to 'camouflage' the area. So camouflaging it was to be....
Then, to match these waistline pleats into the dress I choose to pleat the neckline ruffle. To do this I made up the neckline piece, finishing the outer edge first in a black rolled hem. Then just measured out evenly around to fit the neckline. After attaching the pleated ruffle piece to the dress I overstitched a thin (2mm) lenght of black ribbon to hide the stitching line. It gives a neater finish, and actually has the effect of a necklace from a distance.
The neckline is a beautiful fit, sitting high up around the back. I was worried that it might look a little 'clown-like', but after wearing the dress this wasn't a concern.


And the last change I made to the pattern was to fully line the dress. Being for a formal occasion I lined the dress in a black fabric, which emphasised the black threads in the fabric. I still used the neck and arm facings cut from the outer fabric, and attached the lining to this.
And my last little change was to insert a back vent for ease of wearing. The pattern allows for splits in each side seams, but for this formal dress I felt a vent would be more suitable. I attached the lining to the vent.
And this post wouldn't be complete without a few little shots of the actual event...
And no, I am not height challenged in any way. My beautifully tall daughter is 6'2", and I am average, normal, standard, ordinary, common. Obviously she inherited her height from hubby!!!

Burda 5/2010 Waistcoat 123

My first Burda creation from the Burda magazine.